Book traversal links for A2.2 WANTAI TB-IGRA – step by step
The procedures for collecting blood samples are similar to those of the QFT-Plus, except that direct blood draw into the incubation tubes is not recommended. Instead, blood samples are drawn into lithium heparin tubes and then transferred into the N, T and P tubes. One millilitre of whole blood sample is transferred into each of the test tubes. These tubes are then placed directly in a 37 °C ±1 °C incubator within 2 hours, and incubated for 20–24 hours. These steps are detailed below (3) and shown in Fig. A2.2.1 (up to incubation) and Fig. A2.2.2 (after incubation).
Step 1. Specimen collection
- Each tube should be labelled appropriately.
- For each patient, whole blood should be collected by venepuncture into a lithium heparin tube, and the volume collected should be at least 4 mL. The tube should be shaken well; it can then be stored at 20–27 °C for up to 16 hours before the specimen dispensing step.
Step 2. Specimen dispensing
- Each tube should be labelled appropriately.
- The lithium heparin tube should be gently inverted three to five times to mix the specimens.
- Next, 1 mL of the whole blood specimen should be dispensed into each of the N, T and P tubes.
- The N, T and P tubes should be gently inverted three to five times to mix the specimens.
Step 3. Incubation
- Immediately after mixing, the N, T and P tubes should be placed in a 37 °C incubator.
- The tubes should be incubated in an upright position for 22±2 hours.
Step 4. Centrifugation
After incubation, all tubes should be centrifuged for 10 minutes at 3000–5000 rpm, then the supernatant should be aspirated.
Fig. A2.2.1. WANTAI TB-IGRA workflow – sample preparation and incubation

Source: product insert (3).
Step 5. ELISA
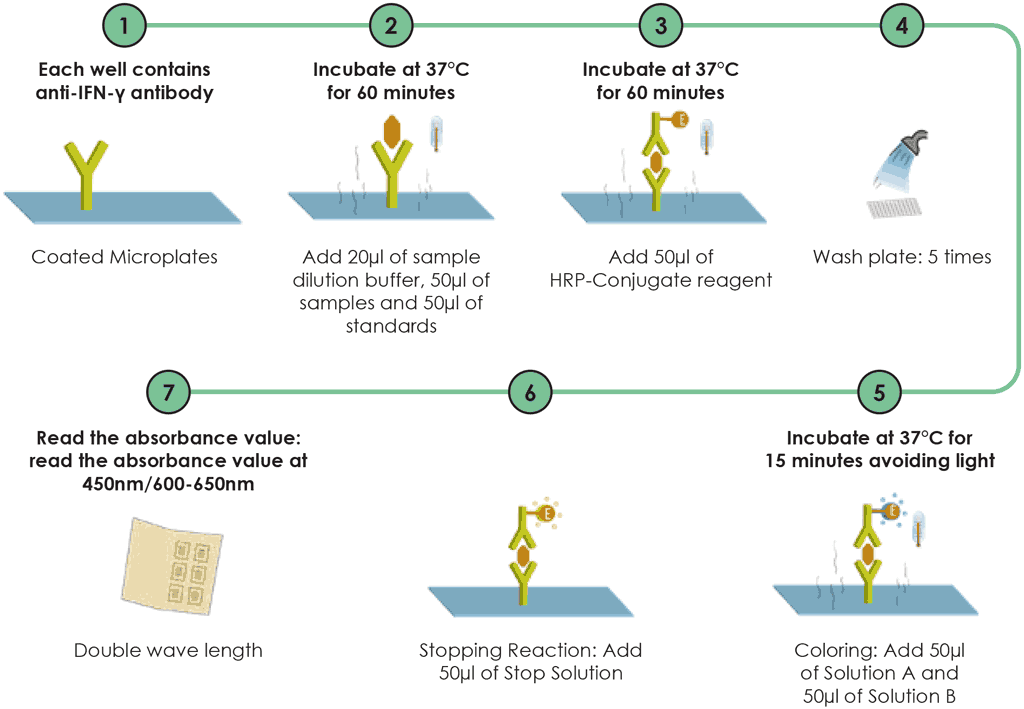
For the ELISA, 20 mL of a sample dilution buffer are added to microplate wells except the Blank well. Add 50 mL of the sample (supernatant), plus 50 mL of the standards solution into the respective wells except the Blank well, mix by tapping the plate gently and, then incubated for 60 minutes, after which horseradish peroxidase reagent is added. All wells are then incubated for a further 60 minutes. Following this, the wells are washed at least five times, ideally using an automated plate washer. Finally, colour A and colour B are added, then all wells are incubated for a further 15 minutes. A final reagent is added to stop the colorimetric action and then the optical density is read using a microplate ELISA reader.
Fig. A2.2.2. WANTAI TB-IGRA workflow – testing procedures after incubation

HRP: horseradish peroxidase; IFN-γ: interferon-gamma.
Source: product insert (3).
Materials and supplies provided by manufacturer
The manufacturer provides the ELISA plate, testing reagents (N, T and P tubes) and standards. The components of the kit should be stored in a refrigerator at 2–8 °C. To assure maximum performance of this TB-IGRA kit, the reagents should be protected from contamination with microorganisms or chemicals during storage. Other materials required but not provided are listed below.
Equipment needed in the laboratory
The following equipment is required in the laboratory for the WANTAI TB-IGRA:
- dry incubator or water bath, 37 °C ±1 °C;
- micro shaker for dissolving and mixing conjugate with samples;
- microwell plate reader, single wavelength 450 nm or dual wavelength 450 nm and 630 nm;
- microwell aspiration and wash system;
- timer; and
- appropriate waste containers for potentially contaminated materials.
Materials needed in the laboratory
The following materials are required in the laboratory for the WANTAI TB-IGRA:
- freshly distilled or deionized water;
- disposable gloves;
- disposable V-shaped troughs;
- dispensing system or pipette (single or multichannel) and disposable pipette tips; and
- absorbent tissue or clean towel.
Personnel needed
For the blood draw, a phlebotomist is required; this can be a nurse, laboratory technician, physician or other allied health professional.
In the laboratory, the steps following incubation are similar to those of the QFT-Plus, although they may be somewhat more labour-intensive. Substantial staff time is required for the centrifugation, pipetting, and mixing of reagents and samples; second incubation; further handling, washing and mixing; third incubation; and, finally, the ELISA measuring, which also involves setting up a standard curve.
Training, supervision and quality control
The personnel involved in this assay require initial training, and ongoing monitoring and evaluation for quality control (QC). The accuracy of the test results depends on the creation of an accurate standard curve. Therefore, the results from the standards must be examined before test sample results can be interpreted.
Precautions
Laboratory technicians should always wear protective clothing (including a laboratory coat, disposable gloves and eye goggles) when working with the chemical reagents needed for this test (3). The WANTAI TB-IGRA is intended for in vitro use only. Failure to adhere to the manufacturer’s instructions may lead to an incorrect interpretation of the results.
Interpretation of WANTAI TB-IGRA
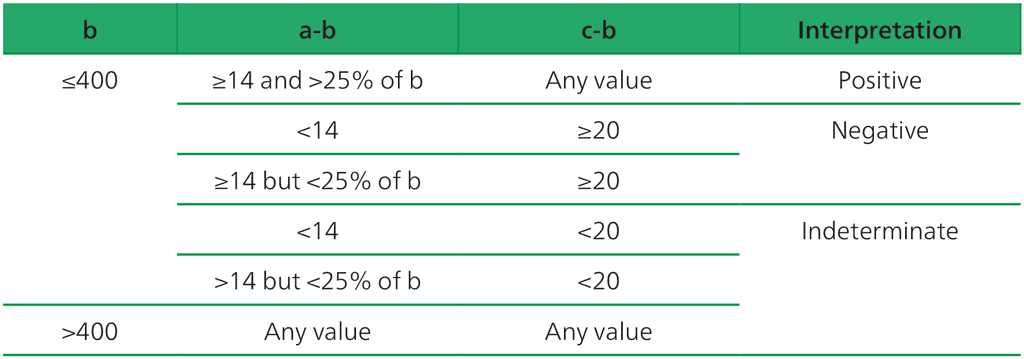
Interpretation of the test result is based on calibrating the standard curve using a series of diluted interferon-gamma standard solutions, then plotting the values for the positive, negative and TB antigen wells on a standard curve. The manufacturer recommends using the criteria shown in Table A2.2.1 when interpreting the WANTAI TB-IGRA results (3).
Table A2.2.1. Interpretation of WANTAI TB-IGRA test results

a = The concentration of testing culture tube (T), b = the concentration of background control tube (N), c = the concentration of positive control tube (P).
Source: product insert (3).
 Feedback